WYSIWYG
The WYSIWYG (What You See Is What You Get) content editor is aimed at non-technical staff. It allows for easy editing of webpages, without people having any prior knowledge of web programming languages. In short, it enables anyone with basic Word Processing skills to be able to edit the website.
To access the WYSIWYG content editor, you will need to navigate to a section (webpage that you would like to edit) in Site Structure and click on it. Clicking "Modify" on any of the content templates will open up the page in WYSIWYG view.
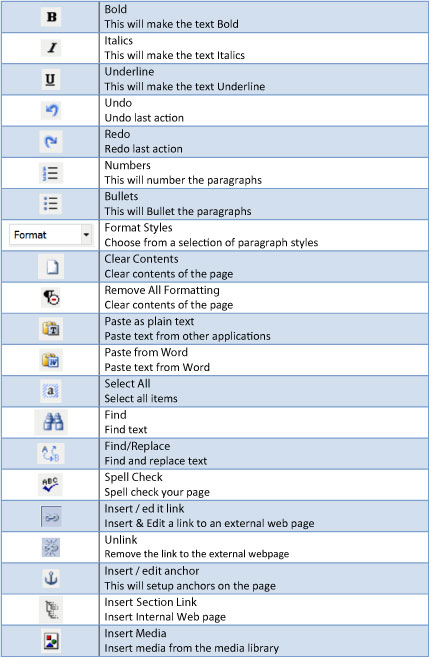
This is a screenshot of the WYSIWYG toolbar:

In the toolbar above, there is a dropdown box, "format". The University's website uses something called CSS (Cascading Style Sheets) to style webpages. These stylesheets define the look and feel of the website. In doing so; paragraphs of text, headings and subheadings are also given a particular style which is consistent across the website. In order for the text on your webpages to be styled correctly, you need to set the text format to be a paragraph, heading or sub-heading accordingly.
The default format for the text you add is paragraph. However, headings will need to be manually formatted. To do this type the text for the heading, highlight the text and then select the appropriate heading from the "format" dropdown. The largest in-page heading should be heading 2 (heading 1 is the main title of the page which you will have already defined). Make sure you use headings to structure the content logically. Think about how it would look on a table of contents. It wouldn't make sense to have "Heading 4" then some text and then "Heading 2" for example. Correct use of heading styles/ levels is imperitive for accessibility and SEO (Search Engine Optimisation). People using screenreaders to access the website will get a much clearer understanding of the page if the headings are structured correctly. Search Engines understand that heading 1 is very important, heading 2 is next important and so on.
It is also worth noting here that there is an icon in the toolbar that reads "HTML". Clicking on this icon opens the page up in HTML view/ the HTML content editor.
Here is a breakdown of each of the icons on the WYSIWYG toolbar. You may recognise some of these icons from Microsoft Word.
Adding media to your webpage
See "media library" section for instructions on how to add media to your webpage.
Just a quick note on links...
Section links are much better to use than direct links. Section links are links to an internal webpage (links to another webpage in T4). If you use a section link and then move the destination page to another section, the section link will automatically update to reflect this and the link will not break. However, if you use a direct link (see the chain icon in the table above) and copy and paste a link e.g. www.hud.ac.uk/undergraduate into the box, then moved the undergraduate section to another section of the website, the link would be broken. Broken links are bad for Search Engine Optimisation (SEO). The best practice is to use section links for all internal webpages.
Direct links will need to be used to link to external webpages. External links (links that do not contain hud.ac.uk in the web address), need to have something called the no follow code added to them in order to ensure SEO benefit.