Microsoft Lync
Microsoft Lync
Microsoft Lync helps end users be more productive by enabling them to communicate and collaborate easily with others in different locations or time zones using a range of different communication options, including instant messaging (IM), voice, desktop sharing and video.
|
An overview on how to load & login to Microsoft Lync. » More |
Set your presence status and what you display to your colleagues. » More |
|
How to change your status, set alerts, publish phone details, turn on and off logging within Microsoft Lync. » More |
Changing the privacy settings, different levels of settings for different colleagues. » More |
|
Changing your display pictures or leaving it as default. » More |
How to add, remove, sort & organise and communicate with your Contacts. » More |
|
Make and control calls, learn how to transfer and forward calls. » More |
How to send and receive Instant Messages. » More |
|
Engage in face-to-face conversation using a webcam. » More |
Send a files & documents during a conversation without the need for e-mail. » More |
|
Share desktop with other users during conversations. » More |
An overview of integration and functionality. » More |


Sign Into Lync & Get Started
See more on signing into Lync and getting started.
Personalise your contact
See more on personalising your contact.
Change your picture settings
See more on changing your picture settings.
Build your contacts list
See more on building your contacts list.
Get in touch by IM
See more on getting in touch by IM.
Privacy Settings
See more on privacy settings.
Integration with outlook
See more on integration with outllook.
Voice call
See more on voice calling.
Video call
See more on video calling.
Desktop Sharing
See more on the desktop sharing.
File Transfer
See more on file transers.
Further Information
See more on further information.
Sign Into Lync & Get Started
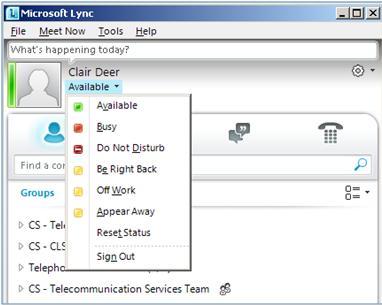
- On the Windows taskbar, click Start, click All Programs, click Microsoft Lync, and then click Microsoft Lync 2010. When the Lync main window opens, if you see your name and your presence status, you’re signed in.
2. Click the availability menu under your name, and then click your presence status
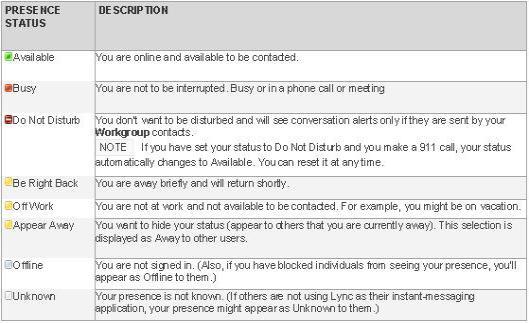
The following table describes each of the presence status indicators:
By default, your presence is linked to your own personal Outlook calendar. If you have a meeting scheduled then your presence will automatically change to 'In A Meeting' or if you take a phone/video call then it will change to 'In A Call'. You can override these settings if you choose and manually pick your presence.
Personalise Your Contact Information
You can personalise your contact information such as your location, phone numbers, and presence information. For example, you can add your mobile phone number and make it available to close contacts only.
- To add a personal note that lets other people know what’s happening today:
- In the Lync main window, click the note box above your name, and then type a note, eg: 'I am away from the Office this afternoon'.
- To remove a personal note, clear the note box so it’s blank (delete the contents of the note box).
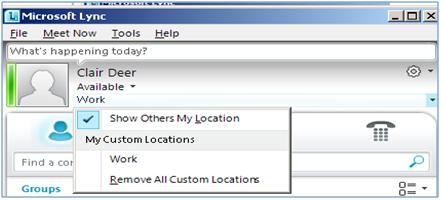
- To set a location to let people know where you are today, click the arrow next to Set Your Location or type in your current location, and then, in the location menu (˅), click Show Others My Location.
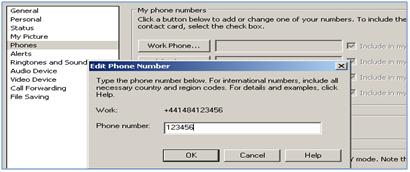
2. To add your phone number, click the Options button , and then click Phones.
3. Click the button for the phone number to add (such as Work Phone or Mobile Phone).
4. In the Edit Phone Number dialog box, type the number, and then click OK.
5. Select the Include in my contact card check box, and then click OK.
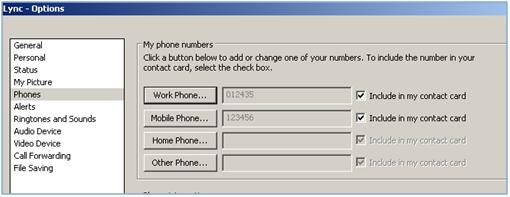
Please note: If work number and mobile number are unable to edit/add as both greyed out, go to Microsoft Outlook then contacts listed.
Find your own contact card and double click to open then delete your phone or mobile number, then go back to Microsoft Lync and box will now be visible to click on. Enter number required then click ok to save.
Once saved re-enter numbers required on contact card in Microsoft Outlook.
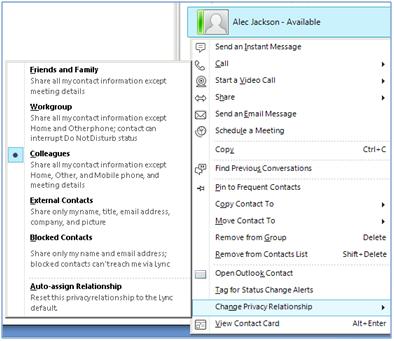
To change privacy relationships for the people you want to see your personal phone numbers, right-click the contact’s name in your Contacts list, click Change Privacy Relationship, and then click one of the options eg: Colleagues
Change Your Picture Settings
You can decide whether you want to see your contacts' pictures. You can also change your own picture or choose not to show one.
Hide your contacts’ pictures:
- In the Lync main window, click the Options button
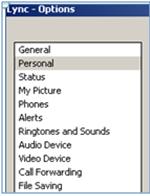
- In the Lync - Options dialog box, click Personal.
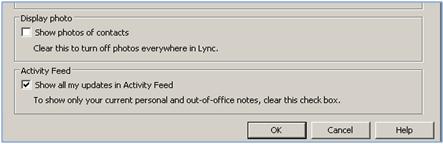
3. Under Display photo, clear the Show photos of contacts untick box to hide pictures of other people, and then click OK.
Hide or change your picture
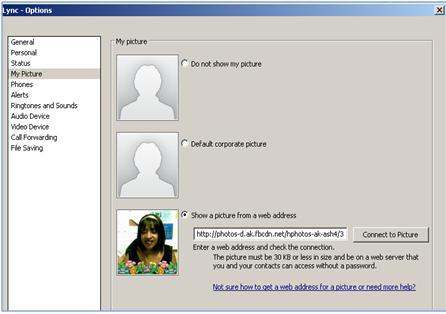
- In the Lync main window, click the Options button.
- In the Lync - Options dialog box, click My Picture.
- Do one of the following:
- To hide your picture, click Do not show my picture.
- To change your picture, click Show a picture from a web address, type the address of a photo site (such as Windows Live® SkyDrive or Facebook) including the file name, and then click the Connect to Picture button.
Build Your Contacts List
Build your Contacts list
Add people to your Contacts list if you'll be contacting them often or if you just want to keep track of them.
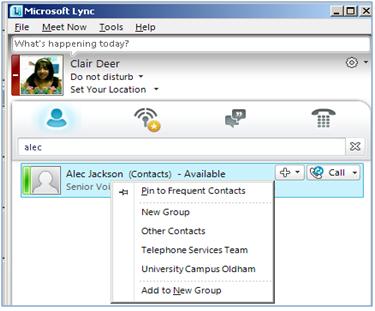
- In the Lync main window, type the person’s name or email address in the search field.
- In the search results, right-click the person.
- (Optional) If you’ll be contacting the person often, click Pin to Frequent Contacts.
- Add them to a group by clicking Add to Contacts List, and then clicking the group name, or, if you haven’t created groups yet, click Add to New Group, and give the group a name eg: Telephone Services Team. You can add more contacts to this group later.
To delete or remove a contact:
- In the Contacts list, right-click the contact you want to remove, and then click Remove from Contacts List.
Get In Touch By IM
To start an instant message (IM) conversation with a person or groups in your Contacts list, do the following steps:
- In the Lync main window, in the Contacts list, double-click the contact with whom you want to IM. When you do this, a conversation window opens.
- At the bottom of the conversation window (next to the Font and Emoticon buttons), type your message, and then press the Enter key to send your message. When the other person gets the message, they will type their message back to you. You can see when they are typing because a message is shown indicating that the other person is typing.
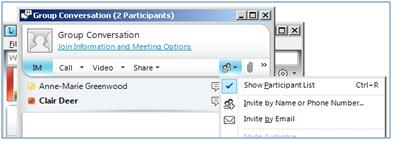
To invite additional people to an IM conversation:
- In the Lync main window, drag a contact name from the Contacts list, and drop it onto the conversation window. To add contacts outside of your organization (whom you cannot send an IM to) to the conversation by email, in the conversation window, click the People Options menu, and then click Invite by Email.
- To join, click a link in the email message (outside users can join the conversation regardless of whether they have Lync installed).
- To reply to an IM, double-click the incoming alert, click anywhere in the text box at the bottom (the area that has the font and emoticon icons), type your reply, and then press Enter on the keyboard. You can use the two icons to change the colour, font, or other formatting, or add an emotion.
- If you cannot connect with other contacts, check with your support team, or view the troubleshooting documentation at Errors and troubleshooting.
View Your Conversation History
By default, Lync automatically saves your IM conversation history. To view or continue previous IM conversations:
- Click the Conversations icon (above the search box).

Lync displays your conversation history.
2. Double-click the conversation that you want to continue.
To delete or remove items from your IM conversation history:
- In the conversation history, right-click the instant message that you want to remove, and then click Delete Conversation.
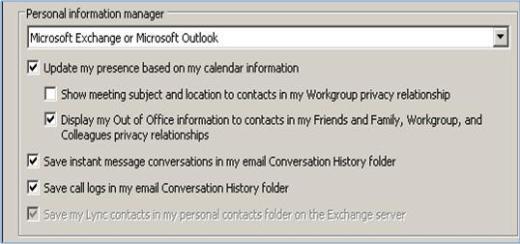
To disable the automatic saving of your IM conversation history:
- In the Lync main window, click the Options button.
- In the Lync - Options dialog box, click Personal.
- Untick the checkbox for Save instant message conversations in my email Conversation History folder.
Integration With Microsoft Outlook
Overview of Features
- Microsoft Lync integration with Outlook allows you to view the availability of your contacts via presence.
- You can call or instant message a contact directly from Outlook with audio and video capabilities.
- Integration with your Outlook calendar automatically updates your presence according to scheduled appointments and Out of Office settings.
- Keep a record of incoming, outgoing, and missed calls and instant message conversations in Outlook.
Send an E-mail from an Instant Messaging Session
- In an instant message, right-click the name of the participant you want to send an email to.
- Click Send an E-mail Message.
- The Outlook Message window appears with the contact you wish to message in the To field.

Send an Instant Message or Call a User from an E-mail
- Open an e-mail from the contact you wish to Instant Message or Call.
- Click IM or Call in the Respond section of the ribbon.
- Alternatively, click the status indicator next to the contact’s name, and select whether you wish to Reply with Instant Message or Call that contact.
- A Communicator instant message or call window will open depending on your selection.
Conversation History Folder
Microsoft Lync keeps a record of instant messaging sessions, phone calls and forwarded calls in a folder in Outlook called Conversation History. A record of missed calls, voice mail and missed conversations is saved to your Inbox.
Each item in the Conversation History folder contains:
- Time and date of message
- Conversation subject
- Conversation body
- Participant names
- Direction of conversation (incoming or outgoing)
In addition, the Conversation History folder contains information about any conversations that included audio, and a complete record of all instant messaging conversations.
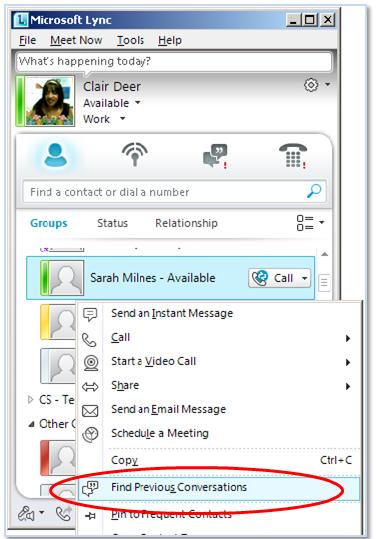
Find Previous Conversations
- In Microsoft Lync, right-click the contact(s) whose conversations you wish to find.
- Click Find Previous Conversations
- All mail items saved in Outlook between you and the selected contact(s) are listed.
Voice Call
Overview
From Microsoft Lync you can make calls to a Contact’s Communicator or other published number and to internal or external phone numbers that are not in your Contact List. When receiving a call in Microsoft Lync you can choose to redirect the call to another number, or if it isn’t appropriate for you to take a call you can change it to an instant message. With Microsoft Lync you can also hold conference calls with several people.
In the Audio Conversation window there are various functions for controlling the call, and further options for interaction such as desktop sharing and file transfer.
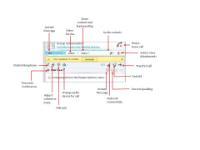
From the Audio Conversation window you can:
- Add video for a face-to-face conversation
- Send an Instant Message for text conversation
- Start desktop sharing
- Invite another participant from your Contact List, the GAL or from an external number , therefore creating a conference call
- Send a file to participant(s)
Conversation Controls include:
- Ending the call
- Putting the call on hold
- Transferring the call to another Contact or another number
- The dial pad, for use in calls that require you to input digits to select options
- Mute speakers
- Mute your microphone
- Audio level indicator to show the pickup of your microphone and speakers
- Call duration to show the length of the call
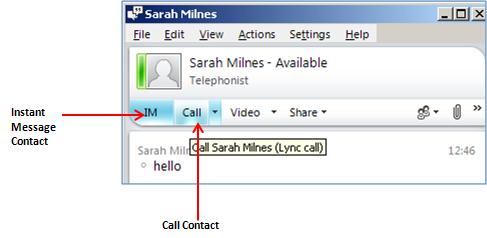
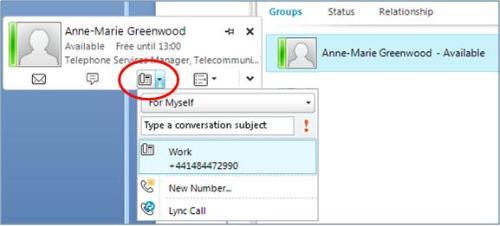
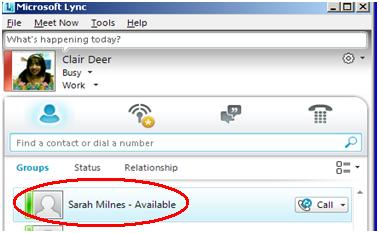
Call a Contact
- Hover over the call icon next to a Contact to show the Microsoft Lync Call icon
- Click the Microsoft Lync Call icon to immediately place a Lync call
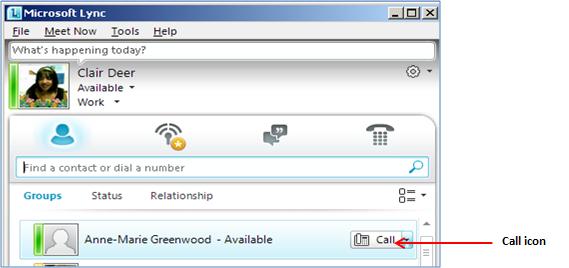
- To view more calling options, click the arrow next to the Microsoft Lync Call iconto open the drop-down menu
- From the drop-down menu you can place a call from Microsoft Lync directly to any of your contact’s published numbers. The options available to you will depend on the access levels your contact has granted you.
Enter a Phone Number to Call
- Use the Search box to directly type in a number you wish to call
- Click the Call button as it appears in the Search Results box to
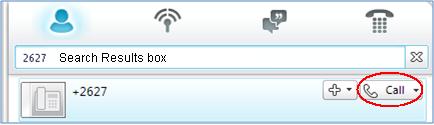
- You can enter an internal phone extension, an external number, or a contact’s name
Controlling a Call
- In the call conversation window are several tools to control and enhance the call. Note that your presence changes to In a call.

![]()
Incoming Calls
When you receive an incoming call, an alert appears in the bottom right of your computer screen.
- To answer an incoming call, click on the phone symbol to accept call invitation.
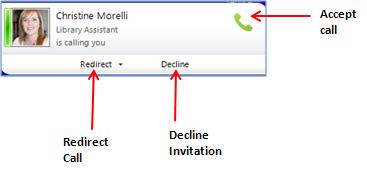
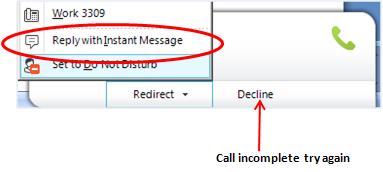
- To redirect an incoming call, click Redirect on the alert, then select an option from the menu.
- If you choose to redirect a call to an instant message, a call rejection message is sent to the caller and the Conversation window opens so that you can send the caller an instant message.
- If the call is declined a message will appear in your box, confirming the call is incomplete as the person did not answer and to retry again later.
Audio Conference Calls
Conference calls must include a minimum of three participants, including yourself.
Start a conference:
- In the Contact List, right-click a group name and click Start Conference Call
- Click the phone number you wish to take the conference on

Join a Conference
You can join an audio/video conference if you have a webcam. Even if you do not have a webcam, although you will not transmit a video stream, you can view the video stream of other people.
Join an audio conference
In the conference invitation alert, click the left pane.
Join from another device
Click Redirect, and then click the phone number of the device from which you want to join
- In a Conversation window containing at least two other participants, click the Phone button
- Click the phone number you wish to take the conference on

Invite Others
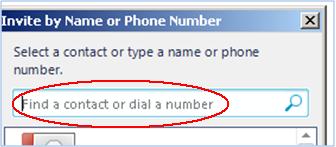
- In the Conversation window, click the Invite button, and then select the contacts that you want to invite
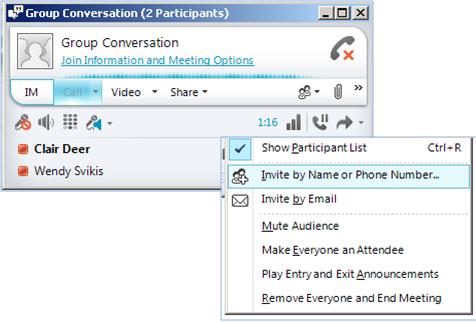
- To invite an external participant, click the Invite button, type the person’s phone number in the Search box, then double-click the number in the Search Results box
Features
- By default the conference leader is the user who initiated the conference.
- To make a participant a conference leader, in the conference roster right-click a participant, then click make Leader
- To eject a participant, right-click the person you want to eject, then click remove from ConferenceTo mute another participant, right-click the person you want to mute, then click Mute
- Have a private conversation with a participant by right-clicking on the participant and clicking Invite to New Conversation. Type a message in the message entry area and press ENTER
Transfer Calls
Transfer to another User
- To transfer a Microsoft Lync call to another user, click Transfer in the Conversation window
![]()
- Click the contact to whom you are transferring the call. For transfer options, move your mouse to the right of the contact name. Click a contact name or phone number in the list, then click OK
- The call is transferred to another user and you are disconnected from the call
![]()
Transfer to another Device
- Click the Transfer button, click Personal Transfer
- Click the device where you want the call transferred
- The call is transferred to the selected device. If you selected a phone as the device, the call is transferred to that phone.
- Remember to set up any phone numbers you may wish to transfer your own calls to
Call Forwarding
- To display call forwarding options, in the Microsoft Lync window click the Call Forwarding button.
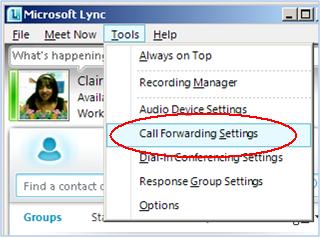
- You can set your calls to be forwarded to voicemail, a new or published number or a Contact
- If you want your Communicator number to ring when call forwarding is on, point to Simultaneously Ring then select the number to which you would like to forward calls. If you do not select this option, Communicator will not ring and calls will be received solely by the forwarding number specified.
- For further options, select Call-Forwarding Settings
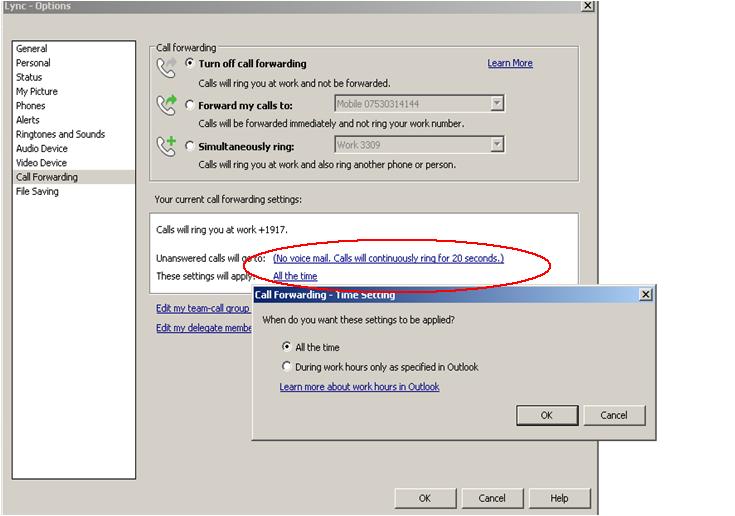
- You can set calls to be forwarded only during office hours, specified in your Outlook calendar by checking the box next to Only apply these settings during my working hours specified in Outlook.
- You can set how long a caller will ring before the call is redirected by scrolling through the menu next to Ring for this many seconds before redirecting.
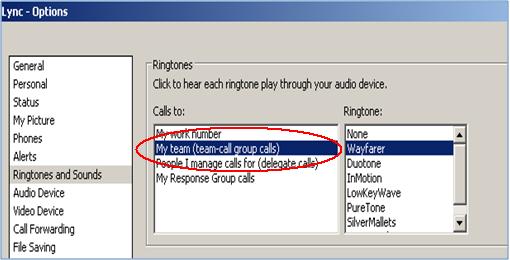
Team Call
- To forward your calls to more than one contact simultaneously, you need to set up team call
- To set up team call, in the Mycorsoft Lync window, click the Tools button and then click options
- From the drop-down list, select Ringtones and Sounds followed by My Team (team-call group calls)
- Click Add, then click Contact

- Select a contact from your list to add to your team-call group, then click OK
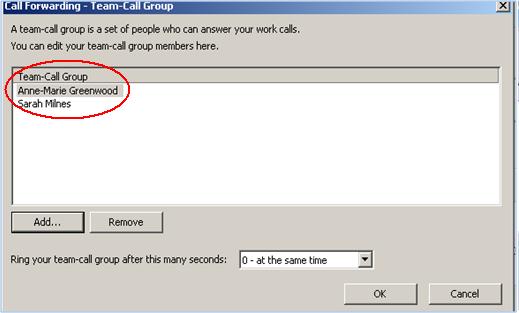
- Repeat the process of Add > Contact until you have added everyone you want in your team-call group.
- All users in the team-call group who receive your forwarded calls will receive an incoming call alert stating that the call is intended for you
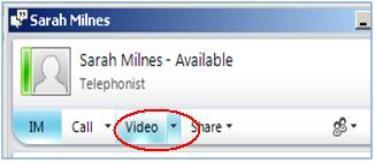
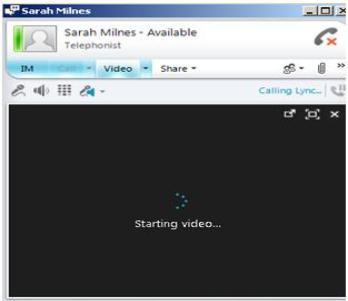
Video Call
You can start a Video conference with an individual user or a group that you select in the Contact List, but you must have a webcam before you can do so.
- In the Contact List, right-click a user or a group name and click Start Video Call
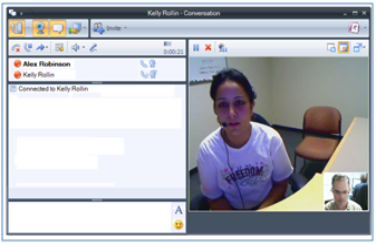
- Screen will appear as below, waiting for call to connect.
- Both parties in the conference can now be seen
- In a Conversation window containing at least two other participants, click the Phone button
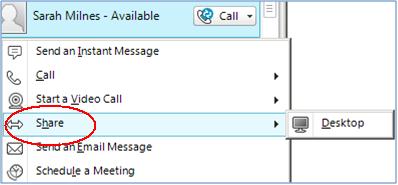
Desktop Sharing
From a Microsoft Lync conversation you can share your entire computer desktop with the other participants and share control so that other participants can provide mouse and keyboard input to the shared desktop.
Share Your Desktop
- Highlight and double-click the contact(s) with whom you wish to enable desktop sharing
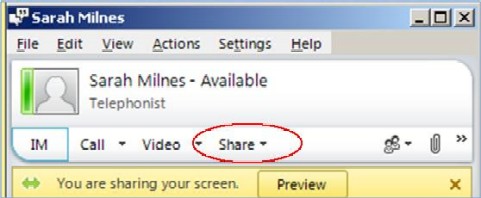
- In the Conversation window, click the Sharing button, then click Share Desktop
- A highlighted frame appears around your entire desktop to indicate that your desktop is currently visible to other participants, with a control menu at the top of the screen with the words In Control: your name
Give Control to another Participant
- While you have control of your desktop, other participants will see a Take Control button, which they can click to control the applications on your desktop. You can also give control to other participants as follows:
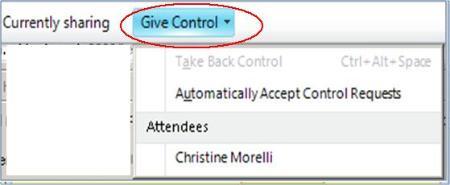
- Click the arrow next to the In Control and then under Share Control, click the name of the participant you wish to pass control to.
- Control will now be with the participant you selected.
- To share control with all participants, click the arrow next to In Control and click Share Control with All Participants
Take Back Control from another Participant
- Click the arrow next to the In Control sharing bar, then click Take Back Control
- You now have control of the desktop and other users do not have control
Stop Desktop Sharing
- When you want to stop other participants from viewing your desktop, you can stop desktop sharing.
- Next to the In Control sharing bar, click the red × button to close the sharing session.

- Stopping desktop sharing does not end an IM or audio conversation that may be in session.
File Transfer
The ability to transfer files using Microsoft Lync allows you to send another user a file without sending an e-mail. You can send files instantly during calls and instant message conversations.
Transfer a File
- When you are in a call, you can drag the file from its folder onto a name in the Participant List
- You can also transfer a file to a contact by dragging the file from its folder onto a name in the Contact List
- In the upper-right corner of the Conversation window, you can use the Send a File button.
- In the Participant List or the Contact List, you can right-click a name and then click Send a File. Browse for the file in your computer then double-click on the file you wish to send.
![]()
Receive a File
- Click Accept in the Conversation window to receive a file from another user
![]()
- Received files are stored in the location specified at set-up. To change this location, click the Menu button on the Microsoft Lync title bar, point to Tools and then click Options.
- In the Options dialogue box, click the File Saving tab
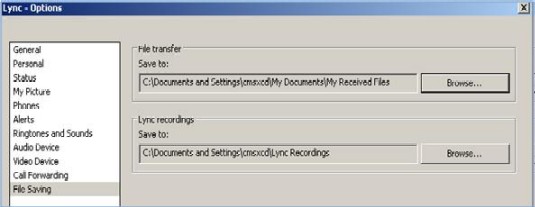
- Under File Saving click Browse, then select a new location for storing received files
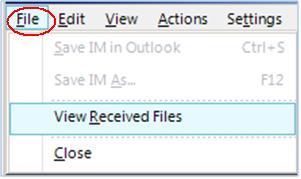
- To view all your received files from Microsoft Lync, click the File button, select View Received Files
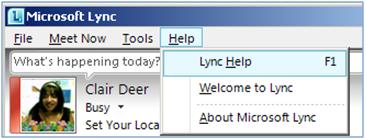
Further Information
- Go to Microsoft Lync and click on Help, then Lync Help
- Enter required search